

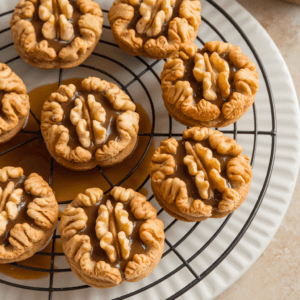
Explore the joy of walnut cookies, a favorite in Eastern Europe. These crispy, nutty treats are called Oreshki. They’re more than a sweet snack; they’re a journey through culture.
Picture biting into a walnut cookie with creamy condensed milk filling. It’s like tasting a piece of family history. Each bite brings memories of holidays and traditions.
Walnut cookies are more than a dessert; they’re an adventure. They have a crunchy outside and a sweet inside. This mix of textures and tastes makes them a favorite in Eastern Europe.
In this guide, you’ll learn how to make these amazing walnut cookies. You’ll find out how to pick the best ingredients and bake them like a pro.
Understanding Traditional Walnut Mould Cookies
Explore the world of traditional walnut cookies, a favorite from the Soviet era. They are known as Oreshki in Russian. These cookies are more than a sweet treat. They carry a rich cultural heritage passed down through generations.
Origins and Cultural Significance
The story of traditional walnut cookies starts in the Soviet era. Home cooks turned leftover dough into tasty treats. These walnut-shaped cookies show creativity and frugality during tough times.
- Originated in Soviet kitchens as a way to minimize food waste
- Became a symbol of family gatherings and holiday celebrations
- Represents culinary ingenuity of Eastern European bakers
What Makes These Cookies Special
Oreshki are special because of their unique shape and creamy fillings. The walnut shell shape is perfect for creamy fillings. This creates a delightful contrast of textures.
| Nutritional Aspect | Value per Cookie |
|---|---|
| Calories | 141 kcal |
| Carbohydrates | 17 g |
| Protein | 1 g |
| Total Fat | 8 g |
Traditional Uses and Occasions
These traditional walnut cookies are key in family celebrations. They are enjoyed from winter holidays to special gatherings. Oreshki remind us of shared moments and cherished memories.
- Essential dessert during family reunions
- Popular treat during Christmas and New Year celebrations
- Passed down through family recipes
Oreshki continue to be a beloved connection to cultural roots, bridging past and present with each delicious bite.
Essential Ingredients for Perfect Cookie Shells

Making delicious homemade walnut cookies begins with the right ingredients. Knowing each part’s role is key to perfect texture and taste.
Start with top-notch ingredients for the best cookie shell. You’ll need:
- All-purpose flour (3 cups or 375g)
- Unsalted butter (1½ cups or 340.5g)
- Powdered sugar (⅓ cup or 40g)
- Baking powder (3 teaspoons)
- Salt (1 teaspoon)
Each ingredient is vital for your cookies. Flour gives structure, butter adds richness, and baking powder makes them light. Powdered sugar adds sweetness and keeps them soft.
Choose fresh, high-quality ingredients. Use room temperature butter for smooth dough. Sift flour to avoid lumps and get a tender cookie.
Pro tip: Always measure ingredients precisely for consistent results every time you bake!
Pay close attention to your ingredients. They will turn simple parts into amazing homemade walnut cookies that everyone will enjoy.
Making the Perfect Dulce de Leche Filling
Creating a delicious dulce de leche filling makes your walnut cookies special. This creamy filling turns your homemade condensed milk into a gourmet delight. Making it might seem hard, but with the right steps, you’ll get it right in no time.
Cooking Method and Tips
Making dulce de leche is easy. You only need a can of sweetened condensed milk. Follow this classic recipe for great results:
- Choose a 14-ounce can of sweetened condensed milk
- Remove the label from the can
- Submerge the sealed can completely in water
- Simmer for approximately 2-3 hours
Achieving the Right Consistency
The secret to perfect dulce de leche is careful cooking. Patience is crucial. Watch as the milk turns into a golden brown, thick but spreadable paste. It should be smooth and creamy.
- Light caramel brown
- Thick but spreadable
- Smooth and creamy
Storage and Shelf Life
Storing your homemade dulce de leche is easy. Put it in an airtight container and chill it. It will thicken, making your walnut cookies even more special.
Pro tip: The filling can be stored in the refrigerator for up to 2 weeks, making it perfect for advance preparation.
Step-by-Step Cookie Shell Preparation

To make the perfect cookie shell, you need to be precise and careful. Start by getting the right ingredients and setting up your workspace.
Make sure you have a walnut cookie mold ready. This tool will help you make cookies that look great and taste amazing.
- Prepare your ingredients at room temperature
- Measure dry ingredients precisely
- Cream butter until soft and fluffy
- Mix ingredients slowly to avoid overmixing
The secret to great cookie shells is in the technique. When using your walnut cookie mold, press the dough gently into each cavity. This ensures your shells are even and the right thickness.
Here are some tips for perfect cookie shells:
- Chill the dough for 30 minutes before molding
- Use a light touch when pressing dough into the mold
- Dust the mold with flour to prevent sticking
- Tap the mold gently to release shaped cookies
When baking, keep the oven at 320 degrees F. This helps cook the cookies evenly and makes them golden. Let them cool in the mold for 5 minutes before moving them to a wire rack.
Your cookie shells will be ready in 32 minutes. You’ll get about 24 cookies that are sure to wow everyone!
Walnut Cookies with Condensed Milk Filling
Making walnut cookies is like art. It needs careful steps and gentle touch. Start your journey to making these treats by learning how to make homemade stuffed cookies that wow everyone.
Assembling Walnut Cookies with Precision
When making walnut cookies, pay close attention. First, make your cookie shells the same size and shape. This makes your filling work better.
- Prepare a clean, flat work surface
- Gather your cooled cookie shells
- Select a piping bag or spoon for filling
Filling Techniques for Perfect Results
Getting good at filling makes your cookies special. Use a piping bag with a small tip for the best results. This helps you put just the right amount of filling in.
Pro tip: Chill your dulce de leche for 15 minutes before filling to achieve the perfect consistency.
Creative Decorative Touches
The last step makes your cookies stand out. Try these ideas:
- Dust with powdered sugar
- Drizzle with melted chocolate
- Sprinkle with finely chopped nuts
Remember, your cookies should look as good as they taste. With practice, you’ll make cookies that impress everyone.
Special Equipment and Tools Needed

Making walnut-shaped cookies needs special tools. These tools can make your baking better. They turn your cookies from good to great.
Here are the main tools for making perfect walnut cookies:
- Walnut Cookie Press: The best tool for walnut cookies. It comes in two types:
- Electric models for exact control
- Traditional stovetop presses for old-school bakers
- Heavy-duty baking sheets with non-stick surfaces
- Precision cookie cutters (about 2 inches in diameter)
- Silicone baking mats for even heat
“The right tools can transform a good baker into a great one.” – Professional Pastry Chef
Think about your budget and how often you bake. High-quality walnut cookie tools might cost more. But they give you precision and consistency.
For beginners, there are cheaper options. You can use round cookie molds or shape cookies by hand. The important thing is knowing how each tool helps your cookies.
Pro tip: If buying special tools feels too much, start with basic ones. Then, get better tools as you get better at baking.
Storage Tips and Shelf Life
Making walnut cookies is an art. Knowing how to keep them fresh is key. Storing them right lets you enjoy their taste and texture for days or weeks.
Proper Storage Methods
Choosing the right container is key for storing walnut cookies. Here are some tips to keep your cookies fresh:
- Use an airtight container with a tight-fitting lid
- Place a sheet of parchment paper between cookie layers
- Store at room temperature away from direct sunlight
- Keep cookies in a cool, dry place
Freezing Instructions
Freezing is great for keeping walnut cookies fresh for a long time. Proper freezing can keep them fresh for up to 2 months. Here’s how to freeze them right:
- Allow cookies to cool completely
- Wrap individual cookies in plastic wrap
- Place wrapped cookies in a freezer-safe container
- Label the container with the date of freezing
Maintaining Freshness
For the best taste and texture, eat your stored walnut cookies within two weeks. Look out for signs of staleness, like losing crispness or flavor changes. When you’re ready to serve frozen cookies, thaw them at room temperature for the best taste.
Pro tip: For maximum enjoyment, bring refrigerated or frozen cookies to room temperature before serving to restore their original texture and flavor.
Creative Filling Variations and Alternatives
Trying new cookie fillings can make your walnut cookies exciting. Nutella is a rich chocolate filling that’s perfect for your cookies. It adds a smooth, hazelnut taste that goes great with the cookie.
Fruit preserves add a burst of flavor. Try homemade raspberry jam, apricot preserves, or fig spread. They make your walnut cookies taste gourmet.
Honey-nut mixtures add natural sweetness. Mix honey with ground almonds or pistachios. This creates a filling that shows off the flavors of your ingredients.
Being creative is important when making new fillings. Try mixing different ingredients or look at desserts from around the world. You might create a new favorite that everyone loves.
Walnut Cookies with Condensed Milk Filling
Equipment
- – Walnut cookie mold (electric or stovetop)
- – Baking sheets
- – Mixing bowls
- Rolling Pin
- – Piping bag or spoon
- – Airtight container for storage
Ingredients
- **For the Cookie Shells:**
- – 3 cups 375g all-purpose flour
- – 1½ cups 340.5g unsalted butter, room temperature
- – ⅓ cup 40g powdered sugar
- – 3 tsp baking powder
- – 1 tsp salt
- **For the Filling:**
- – 1 can 14 oz sweetened condensed milk (for dulce de leche)
- – Optional: Nutella fruit preserves, or honey-nut mixtures for alternative fillings
Instructions
- **Prepare the Dulce de Leche Filling:**
- – Submerge a sealed can of sweetened condensed milk in water and simmer for 2–3 hours. Let it cool completely before use.
- **Make the Cookie Dough:**
- – In a mixing bowl, cream the butter and powdered sugar until fluffy.
- – Sift in the flour, baking powder, and salt. Mix until a smooth dough forms.
- – Chill the dough for 30 minutes.
- **Shape the Cookies:**
- – Preheat the oven to 320°F (160°C).
- – Lightly flour the walnut cookie mold. Press small portions of dough into each cavity, ensuring even thickness.
- – Bake for 10–12 minutes or until golden. Let cool in the mold for 5 minutes before transferring to a wire rack.
- **Fill the Cookies:**
- – Once the cookie shells are completely cool, pipe or spoon the dulce de leche filling into one half of each shell.
- – Gently press the matching shell halves together to form a complete walnut shape.
- **Optional Decoration:**
- – Dust with powdered sugar, drizzle with melted chocolate, or sprinkle with chopped nuts for a decorative touch.
- **Storage:**
- – Store in an airtight container at room temperature for up to 2 weeks. For longer storage, freeze in a freezer-safe container for up to 2 months.