

Craving something crispy and delicious without the guilt? You’re in the right place! This breaded chicken recipe is a game-changer, offering all the crunch you love with a healthier twist. Say goodbye to frying and hello to the magic of your oven!
Using simple ingredients and my easy peasy methods, this dish is perfect for busy weeknights or family gatherings. Even fantastic breasts are handled with care, ensuring every bite is tender and flavorful. Plus, baking instead of frying means less oil and more satisfaction.
This recipe has evolved over time, inspired by family favorites and modern techniques. It’s a healthier take on a classic, proving you don’t need to sacrifice flavor for nutrition. Ready to dive in? Let’s get cooking!
Introduction: A Healthier Twist on Crispy Chicken
Transform your cooking with a simple, oven-based method. This approach delivers the same crispy texture you love, but with less oil and fewer calories. It’s a game-changer for anyone looking to enjoy a healthier version of a classic dish.
Discovering the Oven-Fried Method
The oven-fried method is all about achieving that perfect crunch without deep frying. By using the oven, you can reduce fat while keeping the flavors intact. It’s a technique that’s both innovative and practical.
With just a few minutes of prep time, you can coat your chicken in a blend of quality flour and seasonings. This ensures a golden, crispy exterior every time. Plus, baking allows the chicken to cook evenly, locking in moisture and tenderness.
Why Choose Baking Over Traditional Frying?
Baking offers several advantages over frying. It’s healthier, as it uses significantly less oil. It’s also easier to manage, with no need to monitor hot oil or worry about splatters. Here’s why this method stands out:
- Healthier Option: Baking reduces fat content without sacrificing flavor.
- Even Cooking: The oven ensures your chicken cooks evenly, resulting in tender, juicy fantastic breasts.
- Minimal Prep Time: With just a few minutes of prep, you can have a delicious meal ready in no time.
By choosing baking, you’re not just making a healthier choice—you’re also simplifying your cooking process. It’s a win-win for busy home cooks and health-conscious food lovers alike.
Gathering Ingredients and Essential Tools
Ready to whip up a healthier version of your favorite dish? With just a few simple ingredients and the right tools, you’re on your way to creating a meal that’s both delicious and guilt-free. Let’s dive into what you’ll need to get started.
Simple, Flavorful Ingredients with a My Easy Peasy Touch
This recipe keeps things straightforward with ingredients you likely already have in your pantry. Here’s what you’ll need:
- 1 ½ lb. of fresh chicken: Opt for high-quality cuts to ensure tenderness.
- 1 ½ cups of panko breadcrumbs: For that perfect crunch.
- 1 egg: Helps the coating stick beautifully.
- 1 teaspoon of kosher salt: Enhances flavor.
- ½ teaspoon of black pepper: Adds a subtle kick.
- ½ teaspoon of garlic powder: For a hint of savory goodness.
- ½ teaspoon of onion powder: Boosts depth of flavor.
- ¼ teaspoon of sweet paprika: Adds a touch of warmth.
These ingredients come together effortlessly, making this chicken recipe a breeze to prepare. As one happy cook shared,
“The simplicity of the ingredients is what makes this dish a weeknight favorite.”
Must-Have Kitchen Tools for Oven Perfection
To achieve that golden, crispy exterior, you’ll need a few essential tools:
- Baking sheet: A sturdy one ensures even cooking.
- Parchment paper: Prevents sticking and makes cleanup a snap.
- Mixing bowls: For coating the chicken pieces.
- Whisk: Helps blend the egg mixture smoothly.
Having these tools on hand ensures a seamless cooking experience. For more breaded chicken tips, check out our detailed guide.
With everything prepped and ready, you’re all set to create a dish that’s as easy as it is delicious. Let’s get cooking!
Preparing Chicken for Baking
Discover how to make your chicken tender and flavorful before baking. The secret lies in proper marinating and handling techniques. These steps ensure your dish turns out juicy, crispy, and full of flavor.
Marinating Techniques to Enhance Tenderness
Marinating is a game-changer for keeping your chicken moist. One popular method is using buttermilk. Its acidity helps break down proteins, making the meat tender while allowing it to absorb seasoning.
Here’s a simple process: Mix buttermilk with a blend of salt pepper, garlic powder, and paprika. Let the chicken soak for at least 15 minutes or up to 6 hours in the fridge. This ensures every bite is succulent and flavorful.
For added depth, try adding herbs like thyme or rosemary to the mix. As one home cook shared,
“The buttermilk marinade makes all the difference—it’s my easy peasy trick for perfect chicken every time.”
Tips for Handling Fantastic Breasts with Care
Handling chicken breasts gently is key to preserving their tenderness. Start by patting them dry with paper towels. This helps the seasoning stick better and ensures an even coating.
When applying the marinade, use your hands to massage it into the meat. This ensures every part is covered. Avoid overhandling, as it can break down the fibers and make the meat tough.
Here’s a quick guide to marinating times and tips:
| Marinating Time | Tips |
|---|---|
| 15 minutes | Quick flavor boost for busy cooks. |
| 2-4 hours | Ideal for deeper flavor absorption. |
| 6 hours | Maximum tenderness for thicker cuts. |
By following these steps, you’ll create a dish that’s both tender and packed with flavor. It’s a simple process that delivers impressive results every time.
Crafting the Ultimate Coating
Creating the perfect coating for your dish is both an art and a science. It’s about blending flavors, textures, and techniques to achieve that irresistible crunch without relying on extra fat. With a few simple steps, you can master this process and elevate your cooking game.
Mixing Flour, Seasonings, and a Special Twist
Start by combining flour with a blend of spices like pepper, garlic powder, and paprika. Precise measurements, such as a teaspoon of each, ensure balanced flavors without overpowering the dish. This mixture forms the foundation of your coating, delivering both taste and texture.
Here’s the secret twist: add a pinch of cornstarch to the mix. This ingredient enhances crispiness during baking, giving your dish a golden, crunchy exterior. As one seasoned cook shared,
“The cornstarch trick is a game-changer—it’s my easy peasy way to lock in crunch without extra fat.”
To avoid common pitfalls, stick to the exact measurements. Over-seasoning can overwhelm the flavors, while too much flour can lead to a soggy coating. Here’s a quick guide to perfecting your blend:
| Ingredient | Measurement | Purpose |
|---|---|---|
| Flour | 2 cups | Base for coating |
| Cornstarch | 1 tablespoon | Enhances crispiness |
| Pepper | 1 teaspoon | Adds subtle kick |
| Paprika | ½ teaspoon | Provides warmth |
By following these steps, you’ll create a coating that’s both flavorful and crispy. It’s a simple yet effective method that combines precision with creativity, making it accessible for home cooks of all levels.
The Art of Achieving Maximum Oven Crispiness
Achieving that perfect golden crunch in the oven is easier than you think. With the right techniques, you can enjoy a crispy, flavorful dish without extra fat. Let’s dive into the secrets of oven crispiness, from temperature control to flipping strategies.
Optimal Temperature and Timing Insights
Preheating your oven to 400°F is the first step to success. This temperature ensures the coating crisps up beautifully while keeping the inside tender. Bake for 15-20 minutes, flipping halfway through for even browning.
Timing is crucial. Overcooking can dry out the meat, while undercooking leaves it soggy. Use a meat thermometer to check the internal temperature, aiming for 165°F for safe consumption.

Flipping Techniques to Ensure Even Browning
Flipping your dish halfway through baking is key to achieving a uniform golden color. This simple step ensures both sides crisp up evenly. Use tongs or a spatula to handle the pieces gently, avoiding damage to the coating.
Place your chicken on a baking sheet lined with parchment paper. This prevents sticking and promotes even cooking. For extra crispiness, consider using a wire rack to allow air circulation.
Here’s a quick guide to perfect flipping:
- Flip Once: Turn the pieces halfway through baking for even browning.
- Handle Gently: Use tools to avoid breaking the coating.
- Check Progress: Monitor the color to ensure it’s golden, not burnt.
By following these tips, you’ll create a dish that’s crispy, golden, and delicious every time. It’s a simple process that delivers impressive results, making it perfect for busy home cooks.
Mastering Non Fried Chicken Bread
Unlock the secrets to a crispy, guilt-free dish that’s perfect for any day. With a few expert techniques, you can achieve that golden crunch without relying on extra fat. Let’s dive into the methods that make this possible.
Secret Methods to Lock in Crunch Without Extra Fat
Start by selecting the right ingredients. A cup all-purpose flour mixed with spices forms the base of your coating. Adding a pinch of cornstarch enhances crispiness, ensuring your dish stays light yet crunchy.
Marinating the meat is another game-changer. A buttermilk soak not only tenderizes but also helps the coating adhere better. This step ensures every bite is juicy and flavorful, even after baking.
Precision in baking is key. Preheat your oven to 400°F and bake for 15-20 minutes, flipping halfway through. This technique ensures even browning and locks in the natural juices of the meat.
Here are some expert tips to keep in mind:
- Measure ingredients carefully: A precise cup all-purpose flour blend ensures consistent texture.
- Flip halfway: This simple step guarantees even crispiness on both sides.
- Use parchment paper: It prevents sticking and promotes a golden crust.
For more tips on creating the perfect side dish, check out our detailed guide. With these techniques, you’ll master the art of baking for a dish that’s both light and flavorful, no matter the day or occasion.
Innovative Variations with Chicken Breast Cuts
Spice up your cooking routine with fresh ideas for alternative cuts and seasonings. By exploring different options, you can add variety to your meals while keeping the process my easy peasy. Let’s dive into creative ways to enhance flavor and texture.
Exploring Alternative Cuts and Complementary Spices
Switching up the cuts you use can transform your dish. Drumsticks and wings, for example, offer a richer flavor and juicier texture. Pair them with bold seasonings like smoked paprika or a hint of sugar for a sweet and savory balance.
Here’s a tip: Adjust your seasoning blend to match the cut. For drumsticks, try a smoky rub with garlic powder and cumin. For wings, a tangy mix of lemon pepper and herbs works wonders. These small changes can make a big difference.
When experimenting, keep detailed information on cooking times. Drumsticks may need an extra 5-10 minutes in the oven compared to breasts. This ensures every piece is cooked to perfection.
Don’t forget about leftovers! Store them in an airtight container to preserve flavor. Leftover drumsticks can be shredded for tacos, while wings make a great addition to salads. This reduces waste and keeps meals exciting.
Encourage yourself to try new combinations. Whether it’s a bold spice blend or a different cut, these variations keep your cooking fresh and fun. With these my easy peasy methods, you’ll never run out of ideas.
Creative Serving Suggestions for a Complete Meal
Elevate your meal with creative serving ideas that bring comfort and joy to the table. Whether it’s a weeknight dinner or a special occasion, pairing your dish with the right sides can transform it into a complete, family-friendly feast. Let’s explore how to make every bite memorable.
Pairing with Sides for an Elevated Dining Experience
Classic side dishes like creamy mashed potatoes or glazed vegetables are perfect complements to your crispy creation. The softness of mashed potatoes contrasts beautifully with the crunch of bread crumbs, creating a satisfying balance of textures. For a touch of sweetness, try honey-glazed carrots or roasted sweet potatoes.
Fresh salads add a refreshing element to your meal. A simple garden salad with a tangy vinaigrette or a quinoa salad with cranberries and apples can brighten up the plate. These sides not only enhance flavor but also add a pop of color, making your dish visually appealing.
For a comforting touch, serve homemade biscuits or garlic bread on the side. These warm, buttery additions are perfect for soaking up any extra flavors on your plate. As one home cook shared,
“Pairing my dish with garlic bread turned it into a meal my family couldn’t stop raving about.”
Here are some step-by-step plating tips to ensure a well-balanced dish:
- Start with the Main: Place your chicken breast at the center of the plate.
- Add Sides: Arrange mashed potatoes or vegetables around the main dish.
- Garnish: Sprinkle fresh herbs or a drizzle of sauce for added flair.
Don’t forget the importance of complementary textures. The crunch of bread crumbs pairs wonderfully with the softness of a gently cooked egg or the creaminess of a side dish. These thoughtful details make your meal not just delicious but also a feast for the eyes.
Time-Saving Tips and Clever Storage Ideas
Want to enjoy your meal later without losing its crunch? Here’s how! With a few simple tricks, you can store and reheat your dish while keeping it crispy and flavorful. These my easy peasy methods ensure your leftovers taste just as good as the first bite.
Keeping Your Chicken Crispy in the Fridge
Storing your dish properly is key to maintaining its texture. Start by placing it in an airtight container. This prevents moisture from softening the coating. For extra protection, wrap individual pieces in foil or parchment paper.
Here’s a pro tip: Add a paper towel to the container. It absorbs excess moisture, keeping your dish crunchy. As one home cook shared,
“Using a paper towel made all the difference—my leftovers stayed crispy for days!”
Reheating Techniques That Preserve Flavor
Reheating in the oven is the best way to restore that golden crunch. Preheat to 350°F and place your dish on a baking sheet. For extra crispiness, brush a little butter or oil on top. Bake for 10-15 minutes, flipping halfway through.
If you’re short on time, use a toaster oven. It’s quicker and still delivers great results. Avoid the microwave, as it can make the coating soggy. Here’s a quick guide to reheating:
- Oven Method: Best for even heating and maximum crispiness.
- Toaster Oven: Faster but still effective.
- Microwave: Not recommended for maintaining crunch.
By following these steps, you can enjoy your dish again without compromising flavor or texture. It’s a simple process that makes leftovers just as satisfying as the original meal.
Sending You Off with a Final Tasty Send-Off
You’re now equipped with everything you need to create a dish that’s both crispy and satisfying. From marinating to perfecting the coating, each step is designed to be my easy peasy and fun. Remember, the right oil and a well-balanced mixture are key to achieving that golden crunch.
When baking, preheat your make oven to 400°F for optimal results. Use a pan lined with parchment paper to ensure even cooking and easy cleanup. These small details make a big difference in the final outcome.
Don’t be afraid to experiment with seasonings or cuts to make the recipe your own. The joy of cooking lies in creativity and personalization. With these tips, you’ll master a dish that’s not only delicious but also a family favorite.
So, roll up your sleeves and get cooking! You’ve got all the tools to create something truly special. Enjoy the process, and savor every bite of your homemade masterpiece.
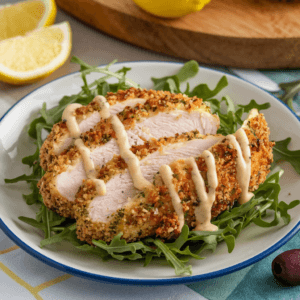
The Best Ever Non-Fried Chicken Bread – No Guilt, All Crunch!
Equipment
- – Baking sheet
- Parchment paper
- – Mixing bowls
- – Whisk
- – Tongs
Ingredients
- – 1 ½ lb. chicken breasts
- – 1 ½ cups panko breadcrumbs
- – 1 egg
- – 1 teaspoon kosher salt
- – ½ teaspoon black pepper
- – ½ teaspoon garlic powder
- – ½ teaspoon onion powder
- – ¼ teaspoon sweet paprika
Instructions
- **Preheat & Prep**: Preheat your oven to 400°F (200°C) and line a baking sheet with parchment paper.
- **Prepare the Coating**: In a bowl, whisk the egg. In another bowl, mix panko breadcrumbs, salt, pepper, garlic powder, onion powder, and paprika.
- **Coat the Chicken**: Dip each chicken breast in the egg, then coat it with the breadcrumb mixture, pressing gently to adhere.
- **Arrange on Baking Sheet**: Place the coated chicken breasts on the prepared baking sheet.
- **Bake**: Bake for 15 minutes, then flip each piece and bake for another 5-7 minutes, or until golden and crispy.
- **Check for Doneness**: Use a meat thermometer to ensure the internal temperature reaches 165°F (74°C).
- **Serve & Enjoy**: Let the chicken rest for a few minutes before serving. Pair with your favorite sides!