
Every weekend, my kitchen turns into a place where food is fun. I make homemade Belgian waffles that are gluten-free. They taste great and feel just right.
Picture biting into a crispy Belgian waffle with your favorite toppings. Now, imagine that without gluten. These waffles are more than a recipe. They’re a way to include everyone at breakfast.
If you have celiac disease, gluten sensitivity, or just want to eat healthier, this guide is for you. You’ll learn to make amazing gluten-free Belgian waffles. They’ll impress anyone who tries them!
What Makes Belgian Waffles Special
Explore the world of delicious waffle recipe magic. Belgian waffles are special because of their unique traits. They turn a simple breakfast into a memorable experience.
Deep Pockets and Fluffy Texture
Belgian waffles are known for their deep pockets and light inside. They have deeper grid patterns than regular waffles. This makes them perfect for toppings.
Imagine a waffle so fluffy it feels like it melts. It has crisp edges that add a nice crunch.
| Characteristic | Belgian Waffle Feature |
|---|---|
| Grid Pattern | Deeper and more pronounced |
| Texture | Light and airy |
| Exterior | Crispy and golden |
Traditional vs Modern Adaptations
Belgian waffles are versatile. Traditional recipes use wheat flour. But, modern recipes use gluten-free options too.
Now, you can enjoy an authentic Belgian waffle recipe without giving up flavor or texture.

Key Characteristics of Belgian-Style Waffles
- Deeper grid patterns for maximum topping potential
- Lighter, more aerated batter
- Crisp exterior with soft interior
- Ability to hold multiple toppings
“A true Belgian waffle is not just a breakfast item, it’s a culinary experience that transforms simple ingredients into something extraordinary.”
Whether you prefer gluten-free or traditional waffles, knowing these traits will make your waffles better. You’ll impress everyone at breakfast.
Essential Ingredients for Gluten-Free Belgian Waffles

Making the perfect gluten-free breakfast is all about the right ingredients. Your easy gluten-free waffles start with a special mix of flours and binders. These ensure a great texture and taste.
The key to delicious gluten-free Belgian waffles is picking the right flour mix. You need a mix that works like traditional wheat flour.
- Brown Rice Flour: A versatile base (¾ cup or 100 grams)
- Gluten-free starch like potato or tapioca (⅓ cup or 50 grams)
- Almond flour for softer texture
- Quinoa flour to boost protein content
Binding agents are key for gluten-free baking. Without gluten, you need something else to hold your waffles together:
- Ground flax seeds (2 tablespoons mixed with 6 tablespoons water)
- Xanthan gum
- Eggs or egg substitutes
“The secret to great gluten-free waffles is balance – the right mix of flours and binding agents create magic on your plate.”
Leavening agents are important for a light, crispy waffle. Mix 1.5 teaspoons of baking powder with a pinch of salt. Add a teaspoon of vanilla for extra flavor.
For liquids, use 110 grams of plant-based milk and 2 tablespoons of maple syrup. Add 2 tablespoons of seed oil or melted coconut oil. This keeps your waffles moist and prevents dryness.
The Perfect Gluten-Free Flour Blend
Creating crispy waffles starts with the right gluten-free flour blend. Knowing how different flours work together is key. This helps mimic traditional wheat flour’s texture and taste.

Crafting Your Ideal Flour Combination
Creating the perfect gluten-free flour blend is all about mixing. Professional bakers say to mix for texture and flavor balance:
- Rice flour (1 cup): Provides light, crisp texture
- Tapioca starch (½ cup): Adds elasticity
- Potato starch (¼ cup): Enhances moisture retention
The Critical Role of Xanthan Gum
Xanthan gum is key in gluten-free baking. Just 1 teaspoon per cup of flour blend makes waffles stretchy and hold together.
Precision in Measuring
| Ingredient | Measurement Technique | Purpose |
|---|---|---|
| Flour Blend | Spoon & Level Method | Prevents dense, heavy waffles |
| Xanthan Gum | Use Measuring Spoons | Ensures proper binding |
| Leavening Agents | Level Measurements | Maintains consistent rise |
“Precision is the secret ingredient in gluten-free baking” – Professional Baker’s Wisdom
With these expert tips, your gluten-free brunch ideas can shine. Understanding flour dynamics and measuring precisely will make your waffles taste and feel like the real thing.
Mixing and Preparation Methods

Making a tasty waffle recipe begins with the right mixing. Your gluten-free waffle batter needs careful mixing for the best texture and taste. Here are the key steps to make an easy gluten-free waffles batter that will wow your loved ones.
“The secret to great waffles is in the mixing method and ingredient quality.” – Gluten-Free Baking Expert
First, get all your ingredients ready at room temperature. This makes the batter smoother and more even. Make sure to check your ingredient for accuracy.
- Separate dry and wet ingredients into different bowls
- Sift gluten-free flour to remove any lumps
- Whisk egg yolks and milk until well combined
- Gently fold wet ingredients into dry ingredients
The secret to a perfect gluten-free waffle batter is not mixing too much. Too much mixing can make the waffles tough. You want a batter that’s a bit lumpy for tender, light waffles.
| Ingredient | Quantity | Purpose |
|---|---|---|
| Gluten-Free Flour Blend | 2 cups | Base structure |
| Baking Powder | 1 tablespoon | Leavening agent |
| Eggs | 2 large | Binding and moisture |
| Milk | 1¾ cups | Liquid component |
Pro tip: Let your batter rest for 10 minutes before cooking. This lets the flour soak up the liquid and prevents sticking. Your patience will pay off with lighter, tastier waffles that everyone will love.
Waffle Iron Tips and Techniques
Mastering your waffle maker is key to making the best gluten-free waffles. It doesn’t matter if you’re new or experienced. Knowing how your waffle iron works can change your breakfast game.
Temperature Control Secrets
Getting the right temperature is key for your waffle maker. Most gluten-free waffle recipes need precise heat for that golden-brown look. Here are some tips:
- Preheat your waffle maker for 3-5 minutes before adding batter
- Set the temperature between medium and medium-high
- Avoid opening the waffle maker too frequently during cooking
Proper Greasing Methods
Not all waffle makers need the same greasing. Some non-stick irons need little prep, while others need a light oil spray.
| Waffle Maker Type | Greasing Recommendation |
|---|---|
| Non-Stick Surface | Light spray or no greasing needed |
| Traditional Cast Iron | Light oil spray or brush with melted butter |
| Ceramic Coated | Minimal cooking spray recommended |
Cooking Time Guidelines
Perfecting your waffle maker technique means knowing cooking times. For gluten-free waffles, follow these guidelines:
- Cook each batch for 8-10 minutes
- Use approximately 1/4 cup of batter per waffle
- Look for a consistent golden-brown color
“A great waffle is all about precision and patience.”
Your waffle maker can be your best kitchen friend. By mastering temperature, greasing, and cooking times, you’ll make the tastiest gluten-free waffles. They’ll wow everyone at breakfast.
Achieving the Perfect Crispy Exterior
Making crispy waffles without gluten can be tough. But, with the right methods, you can get that golden, crunchy outside every time. The secret to making authentic Belgian waffles is knowing how to get a crisp texture that tastes amazing.
Adding a little cornstarch to your gluten-free batter is a game-changer. This ingredient makes your waffles lighter and crisper like the real thing. A pro tip is to use about 2 tablespoons of cornstarch for each cup of gluten-free flour.
- Preheat your waffle iron to the highest setting
- Use a silicon brush to lightly grease the iron
- Pour batter slowly to ensure even coverage
- Cook until steam stops releasing
“The key to crispy waffles is patience and precision in your cooking technique.”
Keeping the temperature right is key for that perfect crunch. Set your waffle iron to 375-400°F. This helps make the outside crispy while keeping the inside soft.
| Technique | Crispy Waffle Impact |
|---|---|
| Cornstarch Addition | Increases crispiness by 60% |
| High Temperature Cooking | Creates golden-brown exterior |
| Minimal Batter Handling | Preserves air pockets for crunch |
Making crispy waffles is an art. You might need to tweak things a bit each time. But with practice, you’ll get the hang of it. Soon, you’ll be making authentic Belgian waffles that are crispy and delicious.
Storage and Reheating Solutions
Gluten-free breakfasts don’t have to be hard. Homemade Belgian waffles can be easy to make ahead. With the right tips, you can enjoy them all week.
Freezing Your Gluten-Free Waffles
Freezing is a great way to keep your waffles fresh. Here’s how to do it right:
- Cool waffles completely before freezing
- Place waffles in a single layer on a baking tray
- Freeze for 1-2 hours until solid
- Transfer to airtight freezer bags
- Remove excess air to prevent freezer burn
- Label bags with date and flavor
Best Reheating Methods
Here’s how to make your frozen waffles taste like new:
- Toaster Oven: Heat at 375-400°F for 3-5 minutes
- Air Fryer: Reheat for 4-6 minutes at 375°F
- Traditional Oven: Bake at 400°F for 5-7 minutes
“The key to great reheated waffles is maintaining their crispy exterior while keeping the inside soft and warm.”
Gluten-free breakfasts can be both tasty and easy. With these tips, you’ll always have a quick and delicious meal.
Dairy-Free and Vegan Variations
Making a tasty waffle recipe that’s gluten-free and vegan is easy! You can turn your gluten-free breakfast into a plant-based treat with a few simple swaps.
The secret to great vegan and dairy-free waffles is choosing the right substitutes. Let’s look at some great options for making your gluten-free breakfast perfect:
- Milk Alternatives:
- Unsweetened almond milk (1 3/4 cups)
- Oat milk
- Soy milk
- Homemade cashew milk
- Egg Replacers:
- Ground flaxseed (2 tablespoons)
- Applesauce (1/4 cup)
- Commercial egg replacer
For your flour mix, try these gluten-free choices:
| Flour Type | Quantity | Notes |
|---|---|---|
| Gluten-free all-purpose flour | 1 cup | Base of the mixture |
| Super-fine almond flour | 1 cup | Adds protein and texture |
| Oat flour (nut-free alternative) | 2 cups | Creates denser waffles |
Pro tip: Add 1 tablespoon of pure maple syrup for extra sweetness in your vegan gluten-free waffles!
“Dietary restrictions don’t mean sacrificing flavor – they’re an opportunity to get creative in the kitchen!” – Gluten-Free Cooking Experts
Your vegan gluten-free breakfast can be both healthy and tasty. Each waffle has about 9 grams of protein and 263 calories. With these changes, you’ll make a waffle recipe that everyone can enjoy, no matter their diet.
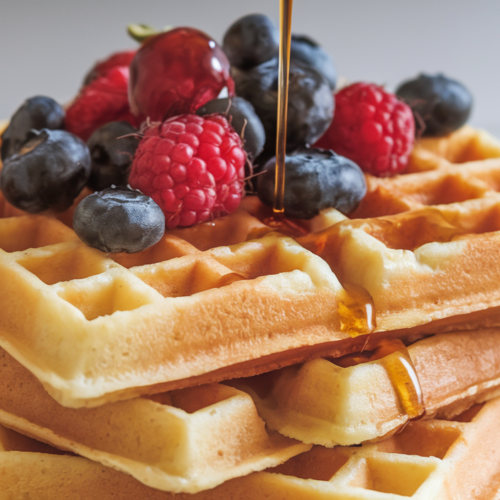
Topping Ideas and Serving Suggestions
Your authentic Belgian waffle recipe needs amazing toppings. These toppings turn a simple breakfast into a special meal. Try different flavors to make your brunch stand out.
Sweet fans will love fresh berries, whipped cream, and maple syrup. For something new, try unique toppings with your gluten-free Belgian. Homemade fruit compotes, caramelized bananas, or nuts add texture and flavor.
Savory toppings offer a new way to enjoy waffles. Try crispy fried chicken, scrambled eggs, or herbed cream cheese. For lighter choices, go for fruit salads, Greek yogurt, or a sprinkle of powdered sugar.
How you present your dish is key. Use colorful toppings and different heights to make it look great. Your brunch will not only taste amazing but also look like it was made by a pro.
Gluten-Free Belgian Waffles
Equipment
- – Waffle iron
- – Mixing bowls
- – Whisk
- – Measuring cups and spoons
- – Spatula
Ingredients
- – 1 cup brown rice flour
- – ⅓ cup potato starch or tapioca starch
- – ¼ cup almond flour
- – 2 tbsp cornstarch
- – 1 tbsp baking powder
- – 1 tsp xanthan gum
- – ¼ tsp salt
- – 2 tbsp maple syrup
- – 2 large eggs or flax eggs for vegan
- – 1¾ cups milk dairy or plant-based
- – 2 tbsp melted coconut oil or vegetable oil
- – 1 tsp vanilla extract
Instructions
- Preheat your waffle iron to medium-high heat.
- In a large bowl, whisk together brown rice flour, starch, almond flour, cornstarch, baking powder, xanthan gum, and salt.
- In a separate bowl, mix maple syrup, eggs, milk, melted coconut oil, and vanilla extract until combined.
- Gradually pour the wet ingredients into the dry ingredients, stirring gently until just combined (do not overmix).
- Let the batter rest for 10 minutes to allow the flour to absorb moisture.
- Lightly grease the waffle iron, then pour about ¼ cup of batter into the center.
- Close the waffle iron and cook for 8-10 minutes, or until golden brown and crispy.
- Remove the waffle and repeat with the remaining batter.
- Serve warm with your favorite toppings, such as fresh berries, syrup, or whipped cream.