
Discover the joy of making traditional Pom-Pom Cookies, a beloved treat with deep cultural roots. Known as “hrustiki” in Ukrainian and “hvorost” in Russian, these sweet, crunchy delights are perfect for festive occasions and family gatherings.
This recipe is simple and uses pantry staples, making it easy for anyone to try. The dough is cut into unique shapes, stacked, and fried to create the signature pom-pom appearance. The result is a light, crispy treat that’s sure to impress.
Best of all, this recipe is inclusive and family-friendly, with no prohibited ingredients. Whether you’re celebrating a holiday or simply enjoying time with loved ones, these cookies are a delightful addition to any occasion.
Gathering Ingredients and Essential Tools
To create a flawless batch, begin by gathering the best ingredients and essential equipment. The quality of your ingredients plays a huge role in the final result. Start with organic flour, which ensures a clean, wholesome base for your dough. Fresh eggs are equally important, as they bind the ingredients and add moisture for a perfect texture.

Precision is key when measuring ingredients. Sifting the flour with baking powder and salt ensures a smooth, lump-free dough. Don’t forget the pure vanilla extract, which enhances the sweet flavor profile of your recipe. These small details make a big difference in the final product.
Quality Ingredients: Flour, Egg, and More
Using high-quality ingredients is non-negotiable for a successful batch. Fresh eggs not only bind the dough but also contribute to its richness. Pair them with organic flour for a light, airy texture. A touch of pure vanilla extract adds depth to the flavor, making every bite memorable.
Must-Have Kitchen Tools for Success
Equip your kitchen with the right tools to make the process seamless. A silicone spatula helps mix ingredients evenly, while a rolling pin ensures the dough is the perfect thickness. Use a crinkled pastry cutter for unique shapes and a thermometer to monitor oil temperature accurately. These tools ensure your baking experience is both enjoyable and successful.
Preparing the Dough with Care
Crafting the perfect dough is the foundation of this delightful recipe. It’s a simple process, but attention to detail ensures a flawless result. Start by sifting your dry ingredients—flour, baking powder, and salt—to create a light, lump-free base. This step is essential for achieving the right texture.

Mixing Dry and Wet Ingredients
Next, beat the egg with vanilla extract until well combined. Slowly incorporate this mixture into the sifted dry ingredients. Use a silicone spatula to mix everything until a uniform dough forms. As one experienced baker puts it,
“The key to a smooth dough is patience—mix gently and thoroughly.”
Kneading and Chilling for Perfect Consistency
Once combined, knead the dough into a smooth ball. This step develops the structure needed for the final texture. After kneading, wrap the dough and refrigerate it for at least 1 hour. Chilling makes the dough easier to roll out and enhances its tender crunch once fried.
| Step | Time | Tip |
|---|---|---|
| Sift dry ingredients | 5 minutes | Use a fine mesh sieve for best results. |
| Mix wet and dry ingredients | 10 minutes | Fold gently to avoid overmixing. |
| Knead and chill dough | 1 hour to 12 hours | Longer chilling improves texture. |
For more tips on perfecting your dough, check out this maple sugar cut-out cookies recipe. It’s a great resource for bakers of all levels.
Baking Perfect Pom-Pom Cookies
Mastering the art of baking these treats requires precision and patience. The final steps in this recipe are crucial for achieving the signature crispy texture and delightful appearance. Let’s walk through the process step by step.

Rolling and Shaping the Dough
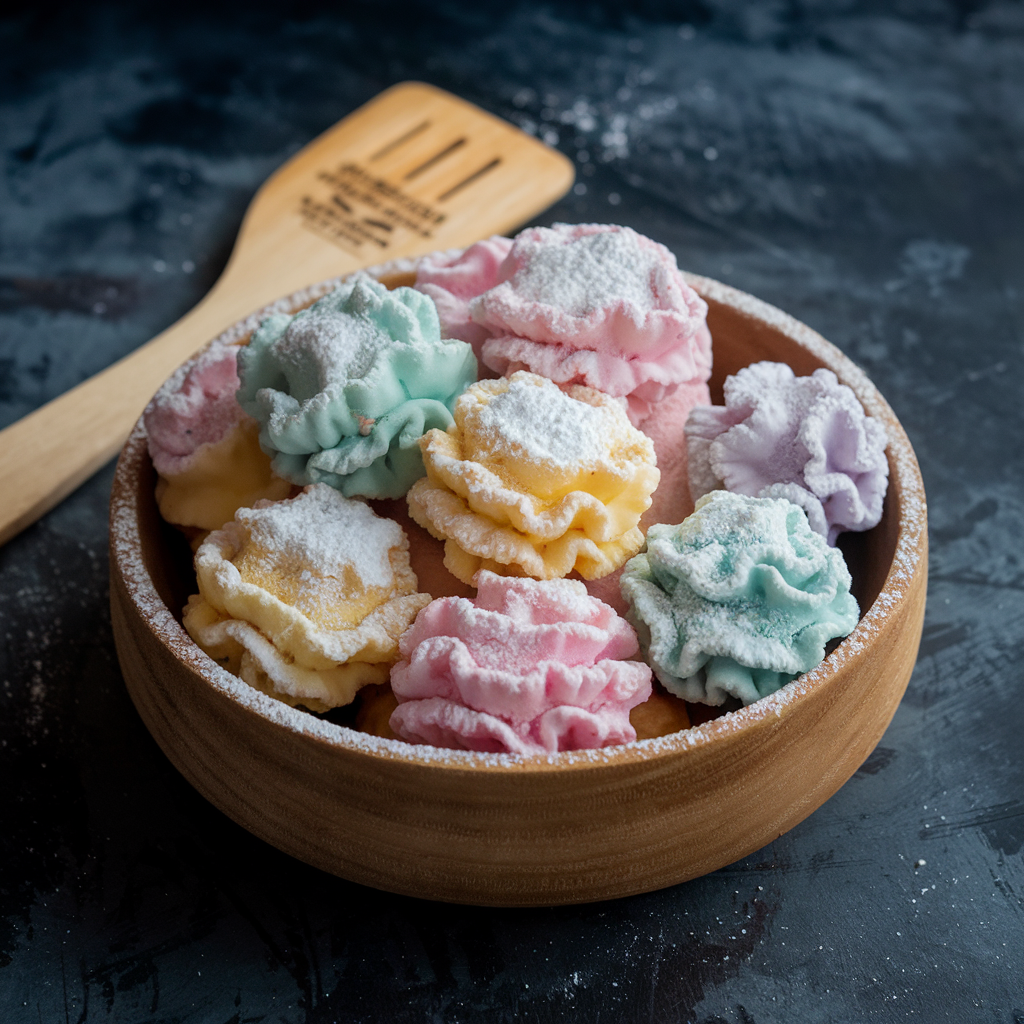
Start by rolling the chilled dough as thin as possible—almost paper-thin. This ensures the cookies will fry evenly and become perfectly crispy. Use a crinkled pastry cutter to create unique shapes. Stack two or three layers of cutouts to achieve the distinctive pom-pom look.
Frying Techniques and Temperature Tips
Heat your oil to around 300°F for optimal frying. Use a thermometer to monitor the temperature closely. Gently place the shaped dough into the oil, stirring lightly to prevent sticking. As one experienced baker advises,
“Maintaining the right temperature is key to avoiding greasy or burnt results.”
Sugar Coating and Finishing Touches
Once the cookies are golden brown and cooled, coat them generously with powdered sugar. This step adds a sweet finish and enhances their visual appeal. For a professional touch, sift the sugar over the cookies to ensure even coverage.
| Step | Time | Tip |
|---|---|---|
| Roll dough | 10 minutes | Use a lightly floured surface to prevent sticking. |
| Fry cookies | 2-3 minutes per batch | Don’t overcrowd the pan for even cooking. |
| Coat with sugar | 5 minutes | Cool completely before coating. |
For more inspiration on creating traditional fried cookies, explore this detailed guide. With these tips, you’ll achieve a batch that’s both beautiful and delicious every time.
Bringing It All Together: Serving and Storage Ideas
Now that your cookies are ready, it’s time to think about serving and storing them. Pair these crispy treats with a hot latte or a cup of Earl Grey tea for a delightful snack. For a festive touch, arrange them on a decorative platter with a sprinkle of powdered sugar to enhance their visual appeal.
To keep your cookies fresh, store them in an airtight container with parchment paper between layers. This prevents sticking and maintains their crisp texture. If you’re planning ahead, they can be refrigerated for up to a week or frozen for several months. Just thaw them at room temperature before serving.
For a warm, fresh-from-the-oven feel, reheat the cookies in a preheated 350°F oven for a few minutes. This restores their crunch and makes them irresistible. For more creative ideas, check out these homemade stuffed cookies to inspire your next baking adventure.

Pom-Pom Cookies
Equipment
- – Mixing bowls
- Hand mixer or stand mixer
- – Whisk
- – Spatula
- – Measuring cups/spoons
- – Baking sheet
- Parchment paper
- Wire rack
- – Spoon or cookie scoop
- – Small Sifter (for powdered sugar)
Ingredients
- – 1 cup 226g unsalted butter, softened
- – ½ cup 100g granulated sugar
- – 1 teaspoon vanilla extract
- – 2 cups 250g all-purpose flour
- – ¼ teaspoon salt
- – ½ cup finely chopped nuts walnuts or pecans, optional
- – ½ cup powdered sugar for rolling
- – Food coloring red, green, or any preferred colors
Instructions
- **Prepare the Dough:**
- – In a mixing bowl, cream together butter and sugar until light and fluffy.
- – Mix in vanilla extract.
- – Gradually add flour and salt, mixing until well combined.
- – If using, fold in chopped nuts.
- **Color the Dough:**
- – Divide the dough into separate bowls based on the number of colors you want.
- – Add a few drops of food coloring to each portion and mix until evenly colored.
- **Shape the Cookies:**
- – Preheat oven to 350°F (175°C) and line a baking sheet with parchment paper.
- – Roll dough into small 1-inch balls and place them on the baking sheet, spacing them slightly apart.
- **Bake:**
- – Bake for 12-15 minutes or until the bottoms are lightly golden.
- – Remove from the oven and let cool for a few minutes.
- **Coat in Powdered Sugar:**
- – While still slightly warm, roll each cookie in powdered sugar.
- – Let cool completely, then roll again for a snowy, soft coating.